
The Battle of Alesia Map is one of the most powerful visual tools for understanding ancient Roman military strategy, especially Julius Caesar’s legendary double siege during the Gallic Wars. The Battle of Alesia Map illustrates how Caesar trapped the Gallic leader Vercingetorix inside a fortified hilltop settlement while simultaneously defending against a massive external relief army. This dual-layered encirclement makes the Battle of Alesia Map essential for anyone studying Roman warfare.
The Battle of Alesia Map also helps simplify one of history’s most complex battles by showing terrain, troop positioning, and defensive structures in a clear format. Without the Battle of Alesia Map, it is difficult to fully understand how Roman engineering and tactical planning worked together. The map transforms historical records into a visual story of strategy, survival, and military brilliance that changed the fate of Gaul forever.
Historical Background of the Battle of Alesia
The Battle of Alesia took place in 52 BC during the Gallic Wars, when Julius Caesar expanded Roman influence across Gaul. The Gallic tribes, led by Vercingetorix, united in resistance against Rome’s growing power. The Battle of Alesia Map helps place this conflict in its geographical context, showing the fortified oppidum surrounded by hills and natural defensive barriers.
The Battle of Alesia Map also explains why Alesia was chosen as a defensive stronghold by the Gallic leader. Positioned on elevated terrain, it seemed nearly impossible to attack directly. However, Caesar turned this advantage into a trap. By analyzing the Battle of Alesia Map, we can clearly see how geography influenced strategy and ultimately led to one of Rome’s greatest victories.
Geographic Layout and Strategic Importance
The Battle of Alesia Map highlights the unique geography of the battlefield, located in modern-day France near Alise-Sainte-Reine. The settlement was surrounded by steep hills, valleys, and rivers, creating both natural defense and strategic limitations. The Battle of Alesia Map shows how these features restricted movement and shaped military decisions on both sides.
The Battle of Alesia Map also demonstrates why controlling terrain was critical in ancient warfare. Caesar used the surrounding geography to build his defensive structures in optimal positions, blocking escape routes and controlling access points. This visual representation makes the Battle of Alesia Map essential for understanding how environment and military engineering worked together in Roman strategy.
Julius Caesar’s Double Siege Strategy
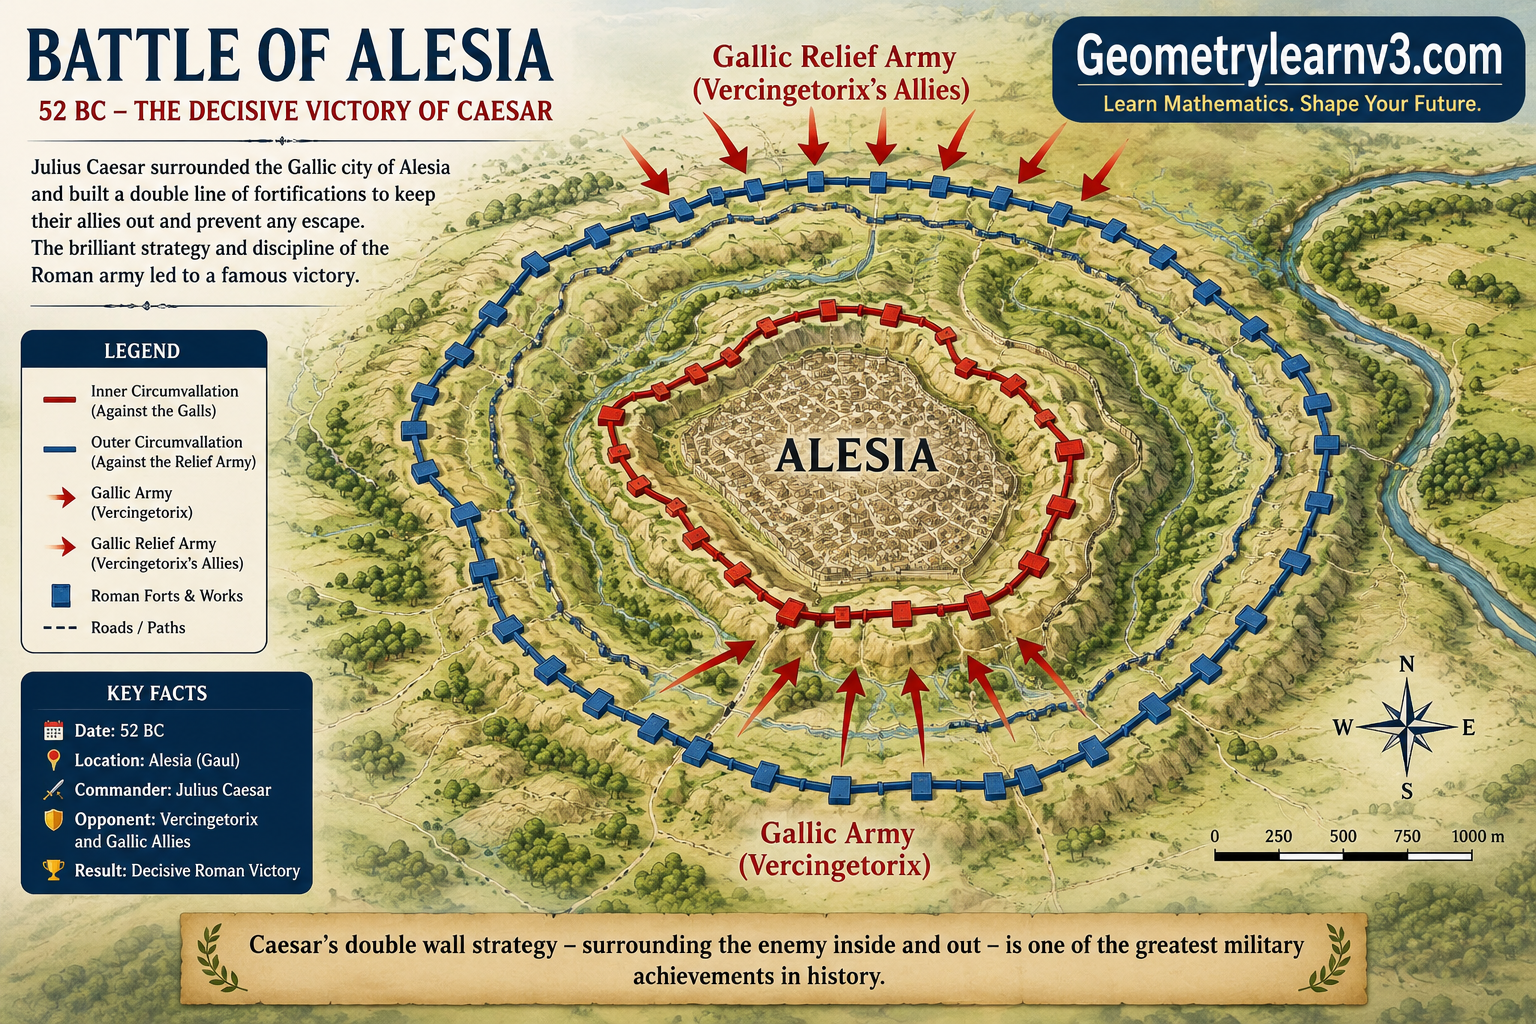
One of the most fascinating aspects shown in the Battle of Alesia Map is Caesar’s double siege strategy, known as circumvallation and contravallation. The inner ring of fortifications trapped Vercingetorix’s army inside Alesia, while the outer ring protected Roman forces from the approaching Gallic relief army. The Battle of Alesia Map clearly visualizes this rare and brilliant military formation.
The Battle of Alesia Map also reveals how Caesar’s strategy turned a potentially dangerous situation into a decisive advantage. By creating two complete defensive lines, Roman forces were able to fight on two fronts without breaking formation. The Battle of Alesia Map demonstrates how engineering, discipline, and tactical planning combined to produce one of the most successful siege strategies in ancient history.
Roman Fortifications and Engineering Mastery
The Battle of Alesia Map showcases the extensive Roman fortification system built during the siege. These defenses included trenches, wooden palisades, towers, spike traps, and earthworks designed to slow enemy movement. The Battle of Alesia Map highlights how these structures formed a continuous barrier around both the inner and outer siege zones.
The Battle of Alesia Map also reflects the extraordinary engineering capability of Roman soldiers, who constructed miles of defenses in a short period. This massive effort required coordination, discipline, and precision. By studying the Battle of Alesia Map, it becomes clear how Roman military engineering was as important as battlefield combat in determining the outcome of the war.
The Gallic Relief Army and Battlefield Pressure
The Battle of Alesia Map also shows the arrival of the Gallic relief army, which attempted to break Caesar’s outer defenses while Vercingetorix attacked from within. This created intense pressure on Roman forces, as they were forced to defend two separate fronts simultaneously. The Battle of Alesia Map clearly illustrates this dangerous two-sided attack.
Despite their large numbers, the Gallic forces struggled to coordinate their attacks effectively. The Battle of Alesia Map shows how Roman fortifications disrupted movement and limited the effectiveness of the relief army. Even with combined pressure, the Gallic forces were unable to break through Caesar’s defenses, highlighting the strength of Roman strategy.
Key Turning Points of the Battle
The Battle of Alesia Map highlights several critical turning points that determined the outcome of the siege. One major moment occurred when Roman forces successfully defended weak sections of the outer fortifications. The Battle of Alesia Map shows how Caesar reinforced these areas just in time to prevent a breakthrough by the Gallic relief army.
Another turning point visible in the Battle of Alesia Map is the gradual collapse of Gallic morale and coordination. As supplies ran low and repeated attacks failed, both inside and outside forces weakened. The Battle of Alesia Map helps explain how sustained pressure and defensive strength ultimately led to Roman victory.
Outcome and Historical Consequences
The Battle of Alesia Map represents the final stage of Rome’s victory over the Gallic resistance. Vercingetorix eventually surrendered after realizing that both escape and reinforcement were impossible. The Battle of Alesia Map clearly demonstrates how Caesar’s double siege ensured total control over the battlefield.
The Battle of Alesia Map also highlights the long-term consequences of this victory. Rome gained full dominance over Gaul, significantly expanding its territory and power. Caesar’s success elevated his political influence in Rome, shaping the future of the Roman Republic. The Battle of Alesia Map remains a key reference for understanding this turning point in history.
Military Importance of the Battle of Alesia Map
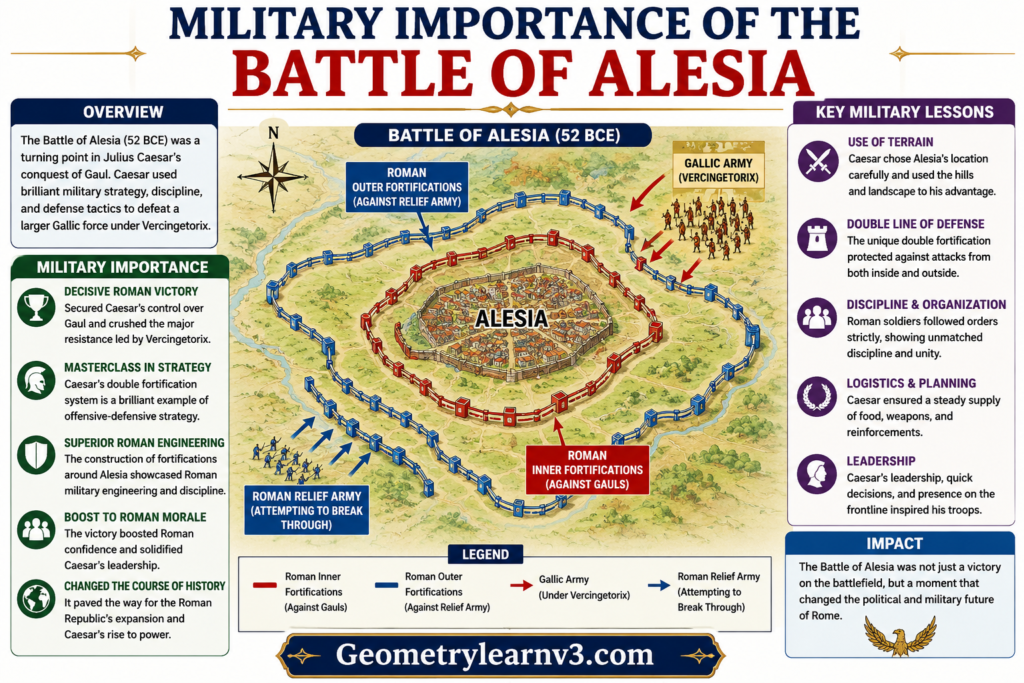
The Battle of Alesia Map is widely studied in military history because it demonstrates one of the most effective siege strategies ever recorded. It shows how terrain, engineering, and tactical foresight can overcome even large numerical disadvantages. The Battle of Alesia Map continues to be used in military education and strategic studies today.
The Battle of Alesia Map also serves as an example of how visualization helps in understanding complex warfare. By breaking down troop movements and fortifications, the map makes ancient strategy accessible and understandable. This is why the Battle of Alesia Map remains relevant in both academic and strategic discussions.
Conclusion
The Battle of Alesia Map provides a detailed visual explanation of Julius Caesar’s double siege strategy, revealing how Roman forces achieved one of their greatest military victories. It connects geography, engineering, and tactics into a single clear representation of ancient warfare.
By studying the Battle of Alesia Map, readers gain a deeper understanding of Roman military genius and the importance of strategic planning in history. The battle remains a timeless example of how intelligence and discipline can overcome overwhelming odds, making the map an essential historical resource.
FAQs
What is the Battle of Alesia Map?
The Battle of Alesia Map is a visual representation of Julius Caesar’s siege strategy showing Roman and Gallic troop positions and fortifications.
Why is the Battle of Alesia Map important?
It helps explain Caesar’s double siege strategy and makes the complex battlefield layout easier to understand.
Where did the Battle of Alesia take place?
It took place in ancient Gaul, in present-day France near Alise-Sainte-Reine.
What was Julius Caesar’s double siege strategy?
It was a tactic where Romans built two defensive walls—one to trap enemies inside and another to defend against outside attacks.
Who fought in the Battle of Alesia?
The battle was fought between Julius Caesar’s Roman army and the Gallic forces led by Vercingetorix.
How did the Romans win the Battle of Alesia?
They used strong fortifications, disciplined troops, and a double encirclement strategy to defeat both Gallic forces inside and outside.
Why do historians study the Battle of Alesia Map?
Because it clearly shows Roman military engineering, battlefield strategy, and the structure of one of history’s greatest sieges.
You May Also Read: Ray Nitschke Memorial Bridge